How to build a SuiteTalk application using the Microsoft .NET platform, and using .NET with NetSuite web services.
After reading this post you will be able to build a SuiteTalk application using the Microsoft .NET platform and understand how to use .NET with NetSuite web services.
Integrating NetSuite with Microsoft .NET Framework in 9 steps
ImportantWhen building an application with Microsoft .NET, NetSuite recommends that you use Visual Studio .NET since it provides an integrated development environment to build and debug your Web service applications. Alternatively, you can download and install the Microsoft .NET Framework SDK. However, this only provides you with the SDK and does NOT provide an integrated IDE.
Step 1
Install Microsoft Visual Studio .NET, version 2003 or higher, which includes the .NET Framework SDK (RECOMMENDED).
Step 2
Start Microsoft Visual Studio. NET.
Step 3
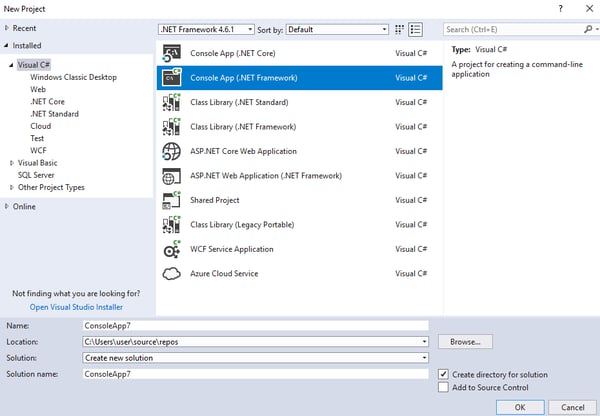
Create a new project and choose a template.
Example: Console Application
Step 4
After the project has been created, add a Web reference.
Go to the Project menu > Add Service Reference > click the Advanced button.
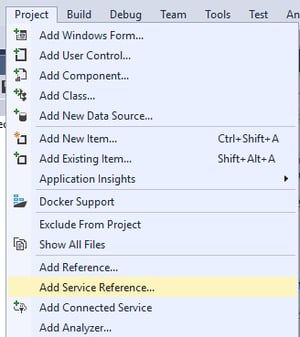
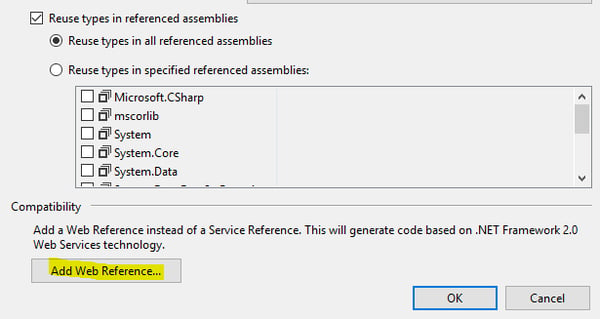
Click the Add Web Reference button.
Step 5
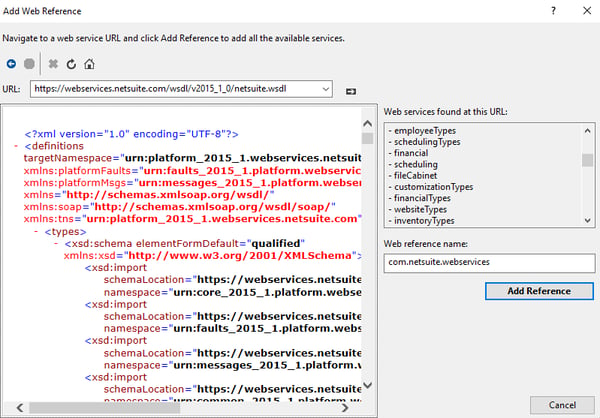
In the Add Web Reference dialog, enter the SuiteTalk WSDL URL and click the Go icon.
Paste the following URL for SUITETALK WSDL: https://webservices.netsuite.com/wsdl/v2015_1_0/netsuite.wsdl
Note: Version 2015_1_0 or below does not require Application ID.
Step 6
Visual Studio inspects the WSDL and displays a summary of the available operations. If security warnings are displayed, click Yes as many times as necessary to continue this process.
Step 7
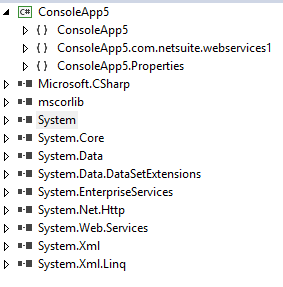
After the summary is displayed, click the Add Reference button to generate the classes. When this process is complete, com.netsuite.webservices is listed under Web References in the Solution Explorer.
Step 8
View all generated proxy classes by doing one of the following:
Option 1 — Enable the Show All Files option in the Project menu.
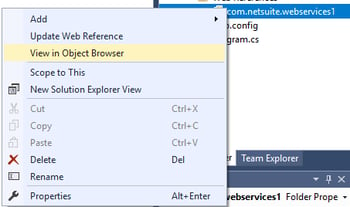
Option 2 — If the above option is unavailable, right-click the com.netsuite.webservices listing in the Solution Explorer and choose View in Object Browser.
Step 9
Implement your application by writing your business logic using the generated .NET proxy classes.
NOTE: The following code snippets are shown in C#
Allow the use of objects from the newly created namespace without having to qualify them
using .com.netsuite.webservices;Instantiate the NetSuite service
NetSuiteService service = new NetSuiteService();Enable support for multiple cookie management
service.CookieContainer = new CookieContainer();Create a valid session by populating the Passport object
//Invoke the login operation
Passport passport = new Passport();
passport.account = "XXXX";
passport.email = "username@netsuite.com";
RecordRef role = new RecordRef();
role.internalId = "3";
passport.role = role;
passport.password = "mypassword";
Status = service.login( passport ).status;
Implement your business logic (for example, create a new customer in NetSuite)
Customer cust = new Customer();
cust.entityID( “XYZ Inc” );
WriteResponse response = service.add( cust );
Log out to invalidate the current session
service.logout();Sample C# code
The following is a sample C# code for adding a Customer
using System.Collections.Generic;
using System.Linq;
using System.Text;
using System.Threading.Tasks;
using Console.com.netsuite.webservices1;
namespace Console
{
class Program
{
static void Main(string[] args)
{
NetSuiteService service = new NetSuiteService();
service.CookieContainer = new System.Net.CookieContainer();
Passport = new Passport();
passport.account = "XXXX";
passport.email = "XXXX";
RecordRef role = new RecordRef();
role.internalId = "1072";
passport.role = role;
passport.password = "1234567788";
service.login(passport);
Status = service.login(passport).status;
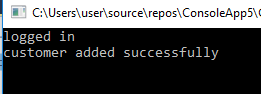
Console.WriteLine("logged in");
Customer cus = new Customer();
cus.companyName = "GOOGLE";
RecordRef subsidiary = new RecordRef();
subsidiary.internalId = "4";
cus.subsidiary= subsidiary;
WriteResponse response = service.add(cus);
Console.WriteLine("customer added successfully");
service.logout();
}
}
}
Here is how the final output will look:
Now, you should be able to integrate NetSuite with Microsoft .NET Framework. If you have any questions or comments, please feel free to contact us. Check out our other NetSuite blogs for how-to guides and tips.